Why the "Customize" button does not appear on product page?
This article refers to Smart Customizer Web to Print App Version 1.0
Reason: Incorrect product linking
In most cases, the Customize Button does not appear on the product page because the Shopify or WooCommerce product is not linked to a customizable product template in the Smart Customizer app.
Solution:
- Go to Smart Customizer app > Products > Open your customizable product template and check if the Link to Product input is not empty.
- A customizable product template should be linked to a Shopify or WooCommerce product that will have the customization option available in your store. To do that, click on the input field, check the list of your Shopify or WooCommerce products and choose a particular one that you want to assign customization to. Then, scroll down to the bottom of the page and Save the changes.
 Once done, open the same product to which you have just assigned customization to and check if the Customize Button appears. If it still does not appear on the product page, please check other related reasons.
Reason: Incompatible Apps
The other frequent reason for Customize button's disappearance is other installed apps on your store. Some other apps can dynamically modify product page elements that are used by the Smart Customizer app. Usually, these are the apps that extend dynamic product variations, quantity selection, and similar options related to the Add to cart functionality.
Solution:
- In most cases, there is no one simple solution to fix the co-existence of two or more apps that take control of the same action. Please contact our support team, to analyze your individual case and to provide some advice on how to solve the issue.
Reason: Shopify/WordPress theme is not compatible with the Smart Customizer app
The Customize button does not show up on a product page because your Shopify store or WordPress page uses a custom design theme or a standard theme was updated / modified. As a result, the Smart Customizer app can not automatically detect page elements to add a Customize button.
NOTE: All Shopify themes that use the Drawer shopping cart type are not compatible with Smart Customizer App.
Solution:
- You can manually define the page elements required by the Smart Customizer app, but this might require some basic knowledge of HTML/CSS and how to use the developer console of your browser.
-
Open product page on your store. Place the mouse cursor on the Add to cart button and click once on the right mouse button. Select Inspect from the panel list.
 Once the developer's console appears on your browser's screen, you will see the Elements tab open. Here you will find a highlighted line with the HTML code of an inspected element - in this case, it is the HTML code of the Add to the cart button.
 NOTE:
NOTE:- In some browsers or browser versions Inspect might be called as Inspect element.
- If you using Safari ensure that developer tools are enabled. How to do this check this article: Safari element inspect.
-
If the highlighted element on the page is not a button, please try to repeat the inspection again.
-
Click right mouse button on highlighted code line and select Copy > Copy Selector.

-
You should have a text (selector) copied in your clipboard. The text should look similarly to an example below: #product-form-template--15726930559033main > div > button.product-formsubmit.button.button--full-width.button--secondary
-
You will only need a short text segment with dots for further steps of selector style: button.product-form__submit.button.button--full-width.button--secondary
-
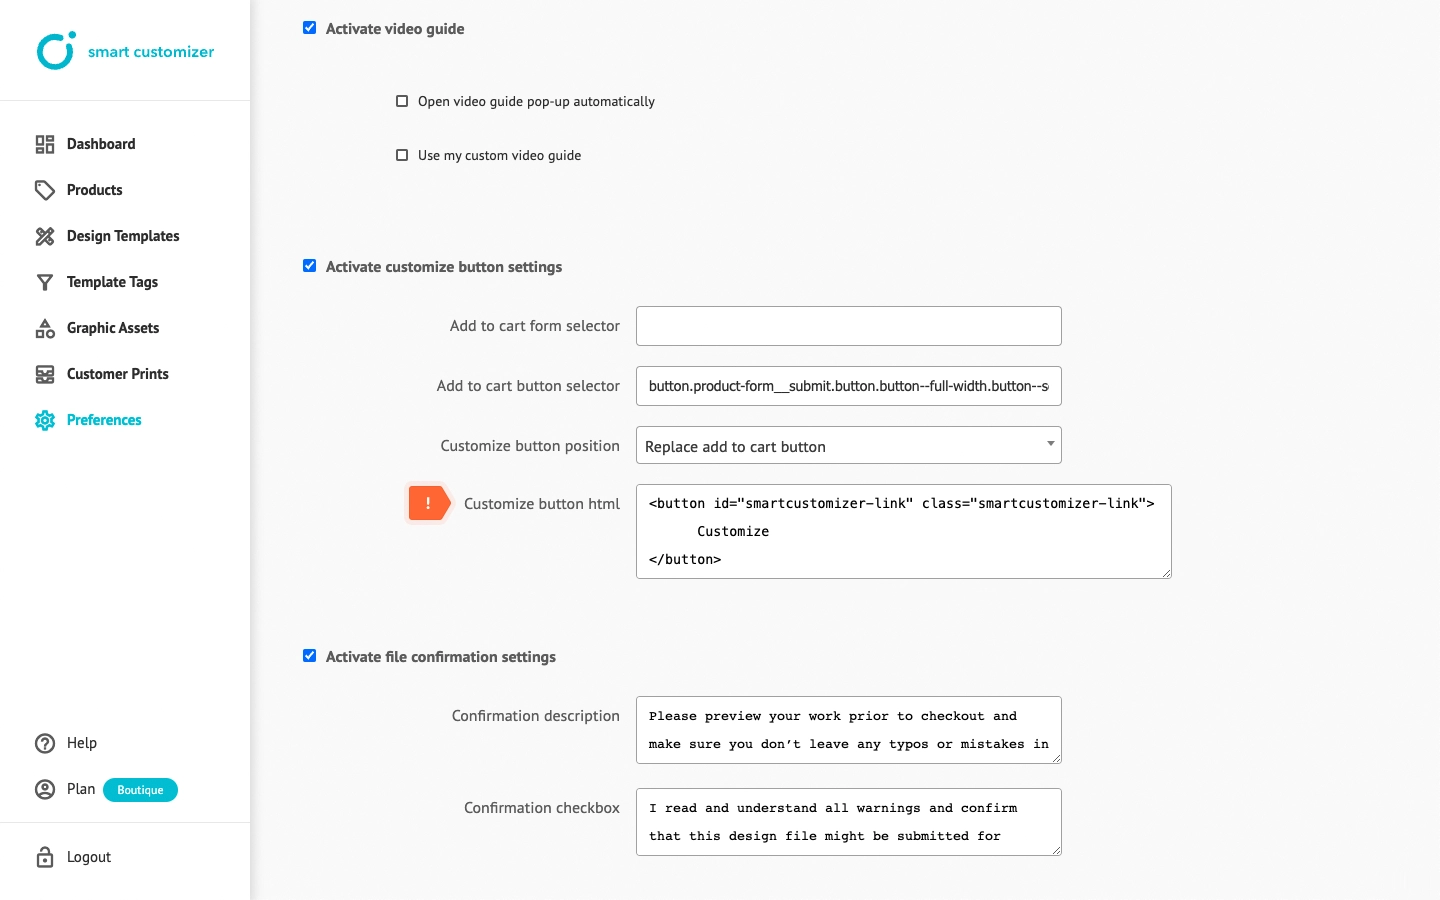
Open the Smart Customizer App, navigate to the Preferences page, scroll down and find the Activate customize button settings option. Activate the checkbox and paste in what's in your clipboard - text (selector) code in the Add to cart button selector input field.

-
Scroll to the bottom of the page and Save the changes to take effect.
-
Go to the product page and refresh it. The button Customize should appear.
Advanced tips
- You can also specify the position of the Customize button in a product page. More specifically, the position above or below the Add to cart button. You can even replace the Add to cart button if needed. To do that, click on the Customize button position dropdown and choose a necessary option.
- In cases when page has two same Add to cart buttons (typically same buttons are placed in different forms and one is hidden), Add to cart form selector should be used as a helper to define in which form to look for the Add to cart button.
- In the Customize button html you can define button HTML and inline CSS style. Best way to do this is to copy existing button html snippet and modify it. An id: "smartcustomizer-link" and class: "smartcustomizer-link" should be added to button element. Example button code:
Customize


